Tuesday, October 25, 2016

Colour Blast: "Friends" by Michelle Logan


Hi Everyone, popping in to share 
 an Art Journal Page with a vintage feel that I made for Colour Blast earlier this month.
So here is the page:
I have created this in my altered book journal.


And lets get started on how I did the background:


First I created texture using a palette knife and Heavy Gesso. I also used a small damask stencil with the same Heavy Gesso, creating a raised pattern.


    I selected my colour palette from the water colour cakes of Colour Mica Powder I made (PolarCool Mint & Espresso) and a few Colour Sprays (Sapphire & Lagoon) and Colour Shimmer Spray (Bling & Leather).


    I used all the colours to splash around on my background till I was happy with it. 


       I then glued down strips of scrap patterned paper where I planned to put the main focus of the page. Then added a scrape or 2 of Gesso to tie the composition together.


          I then added more splashes of colour. 


          Now its time to add layers to the main focus, and embellish with lots of little bits. I have used an old pic I found in an childrens' story book from the 1950's as a main focal point, with an overlay I found in my stash.


             I used more Colour Spray to colour my chipboard pieces to coordinate with the rest of the page.


            I did more layering on the opposite page and added some tiny Art Stones using Clear Gesso in random places across the page and also some stamping using background stamps and Archival ink.


            And there you have it the page is done! 
            Here are a few detail shots:


             The Colour Blast Products used:


            And that is all! Thanks for stopping by and I hope I have inspired! 
            For all the wonderful Colour Blast Products head here, there are so many lovely colours to choose from!
            Till next time, 
            Keep Crafting!

            Michelle

            Tuesday, October 18, 2016

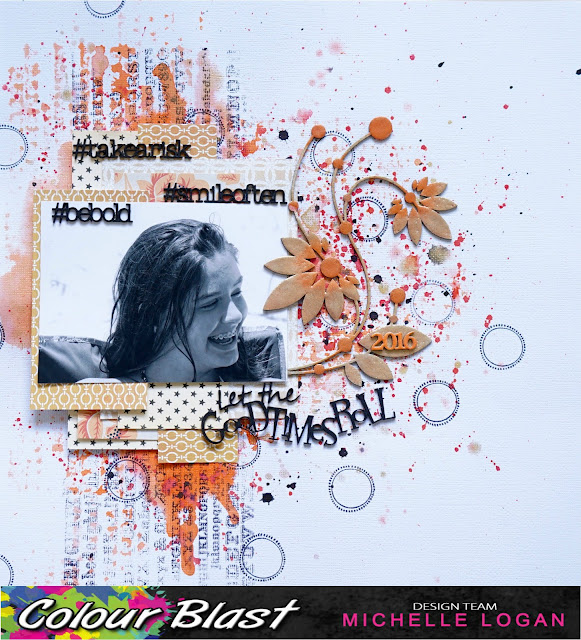
            "Good Times Roll" A layout for Colour Blast DT.


            A big Hello to all!
            I am back to catch up on a layout featuring my niece made for Colour Blast.
            I used this page to play with the new Colour Mica Powders and Colour Shimmer Dusts.
            So without further ado, here is the page:


            This was a fun and easy background to create, here is how I did it:
            First up I created a puddle of colour on my plain cardstock using Colour Shimmer Dust in Amber and Colour Shimmer Spray in Bling
            Using the puddle as a "stamp pad" I then added some loose text print using a stamp. I did not want a perfect crisp image here I just wanted to create some interesting texture radiating out of the puddle.


              I then used a "watercolour cake" that I made earlier using Colour Mica Powder inWatermelon, Gum Arabic and water. I activated the cake with a spray of water then with a wet brush, I flicked over the page to create some splatters.


                While waiting for the puddle to dry, I layered my patterned papers under my photo and painted all my chipboard embellishments that I plan to use with white Gesso. I do this when I do not quite know what colour will work best with the page.

                  With the main embellishment I decided I wanted to give it a bit of shine to make it pop forward not blend in to the background, so I treated it with a combination of Bling andTangareen Dream Colour Embossing Powders. I used a few layers to create a smooth finish.

                    Now back to the background! I decided it needed more depth so I added more splashes using Colour Shimmer Spray in Bling and Tangareen DreamRoad Base Colour  Spray and some stamped images using an Archival Stamp Pad.


                      After laying the photo and embellishments down on the page I decided on the colour of the Title and other pieces needed no more than a coat of Black Gesso. 


                        All that was left to do was to put it all together! It worked out to be a quick and simple page, why don't you give it a try then post it on the Colour Blast Creative Corner so we can all admire!!!
                        Here are a few detailed shots for you all:


                        I hope you have enjoyed my little step by step, and you feel inspired to create for yourself, don't forget to share what you have created!
                        Happy Scrapping Everyone!


                        Sunday, October 9, 2016

                        Projects for Scrap FX.

                        Hi Everyone I am back finally!! This blog is so sadly neglected of late but I am trying my best in the next week or so to play catch up....so get ready everyone!!!
                        So first up some projects I created for Scrap FX using loads of new goodies.
                        Ok here we go, I shall start with a simple wedding card.
                        I have used the Scrap FX "Love banner" chippie as the main focus. It was absolutely perfect for the theme and super quick to put together!
                        cardsept16
                        The background was made using water colours in a few varying shades and the chippy piece was just painted black, add a few dots of perfect pearls and the job was done!

                        Next, a scrapbook layout featuring my niece, it is very pink and girlie!!!
                        I used the Fancy Feathers (small) as well as the fabulous Spirit Phrase.
                        Free Spirit phrase
                        Spiritsept16

                        This was  made with a quick painted and stamped background, layers of scrap paper and the chippies were heat embossed.
                        Then we have 2 art journal pages:

                        Learning to Fly
                        I so loved the Learning to Fly Silhouette, it reminded me of a quote in the children's book "Peter Pan", so I just had to get creative in my journal straight away!

                        AJ2sept16


                        Last project is using the flying birds stencil with some Colour Blast Colour paste.
                        Flying Birds stencil
                        AJsept16

                        And that is all from me for the moment, I will not leave it so long for the next post, I have so much to share!
                        Michelle.