Showing posts with label Technique tutorial. Show all posts

Sunday, February 19, 2017

"Gorgeous...." a page for Colour Blast.

Hi everyone and a happy belated New year!
Apologies for not being around but I was having a wonderful fun filled summer!
So I now have to face up to all the catching up I have to do.....and the washing!!!
So over the next week or so I am going to catch up on my projects that have not reached this little old blog. First up here is a layout and tutorial I did for Colour Blast late last year...I think...LOL!

The LO features one of my gorgeous nieces that live a long way away in the States.
I love getting their photos, it is a chance for me to get a girlie fix, not that this page is very girlie really you could do the same for a masculine page too.
So here is the page:


And now a few step by step pics to show how I created it:


I drew roughly where I wanted to place the ball flower thingies...lets call them blooms form now on.
I tore up old book paper and glued the pieces down with Gel Medium as a start to my Blooms.


 Once dry I added some Glass bead Gel to create some texture.
I then chose my colour scheme and gathered supplies....time to get splashy with colour!
I splattered a few drops of Colour Shimmer Spray in Bling first all over the page.


     I sprinkled Colour Mica Powder: Lemon Zing and Colour Shimmer Dust: Sunflower, Amber & Lollipop on to the Blooms then added water with a brush moving the colour around into a ball shape.


       I was not happy with the shapes they turned out a bit "Blobby" so I decided to use the sprayer out of the Colour Sprays:  Bubblegum as a "brush" and do some defining scratches to make the blobs look a little more organic and loose.


        They ended up looking a little more like flowers, loved the scratchy bits.
        Then I used the sprayer to splash more colour around the page. 


          I did a total of 3 Blooms (have to work with odd numbers for balance).
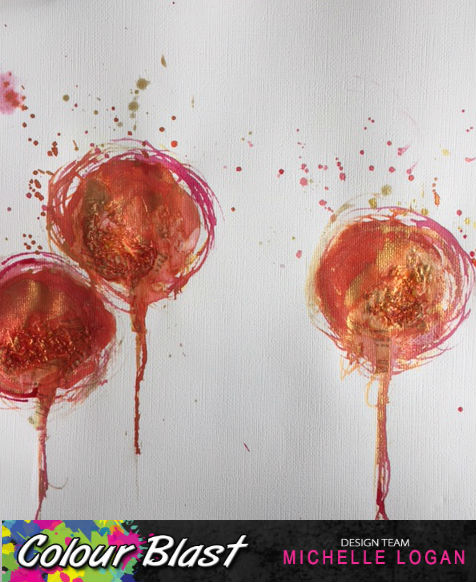


            I felt they still needed some texture so I reached for the Colour Embossing Powder in Bling adding a few layers heating as I sprinkled. 


              I added some doodly lines to define the blooms with a Posca paint pen in Black.
              I think I can call them done now!


                Lastly I layered patterned paper around my photo, added the chipboard title that I painted black and lastly a few embossed chippy hearts done with the Bling Colour Embossing Powder to tie the composition together. 


                  So the page is done, what do you think?


                  The blooms were once again an experiment but I do love a play and I think they turned out ok!


                  The close ups don't really show the blissful shimmer of all the powders and the shine of the embossing powder sorry you shall just have to believe me when I say it looks fab!!


                  Still a few more bits and pieces to show you all so I will be back in the next few days to do just that! 
                  Thanks for visiting see you again soon!!


                  Friday, February 22, 2013

                  Welcome to the ScrapFX Technique Hop!!!


                  Welcome Friends to the first stop in our Technique Hop.
                  I am starting with some very simple techniques that are my "Go To" staples for  ScrapFX chippies and stencils!!! The other amazing ladies will further inspire you, so be sure to check them all out and leave a comment back on the ScrapFX Blog to be in the running for that amazing major prize!!!!
                  So here goes........

                  As you all may or may not know, I am a Mum to 2 boys. Masculine pages are my comfort zone, however, my eldest is now 15, with his brother closely following at 12. So the cutesy stuff no longer cuts the mustard! So how to create for the pesky teen???? The answer..... be messy & grungy!!!!
                  Think "Graffiti" for the look that I think suits most.

                  I do know that it is a struggle at times to find the right look for a Teen (especially Boys) when a flower (have never been good at that) will just not work. So stay with me for a bit and maybe I can get the ball rolling and the mind ticking away for some totally teen embellishments and backgrounds!!
                  This is my first full blown tutorial so I apologise in advance if I am way too "Wordy"!

                  This is the page I am basing this tutorial on, I have used Scrap FX chippies and the awesome Urban Stencil.


                  Technique#1: Simple Stencil Background

                  To create the background I randomly sprayed mists with no particular pattern in mind.

                  This is the Urban Stencil,
                  very hard to get a great shot ....sorry!

                  Then with a fineliner I used components of the stencil to outline, I love this stencil for that particular reason, it looks great with any pastes or paint also..... but that will have to wait for another time!! 


                  This gives the background some definition without overloading the page before you have even begun.... very simple right!!!!

                  Technique #2: Perfectly Imperfect Embossing!

                  I often go for a rustic textured look,  I don't use an embossing ink pad because I do not want it to have perfect coverage. So first step is to use a paint dabber and coat the letter with paint in a random manner, varying the thickness (that is why a dabber works well).
                  Whilst still wet, sprinkle with the embossing powder and tap off excess.
                  Heat as usual with a heat gun, you have yourself some great texture!

                  You will find that the powder sticks
                  on random spots of paint. 
                  After heating you have
                  great texture to work with.
                  Then spray with the mists used in the background, you do not have to wait for the powder to cool, just fire away. As the ink dries it will pool for a great effect.
                  Use the Sprays whilst the
                  powder is cooling.
                  The pools of colour
                  catch in all the low spots
                  created by the embossing. 
                  The letters are now ready to add to the page!

                  A Title is Born!
                  Technique#3: Grungy Embellishments (last one I promise then you can be off on your merry way)

                  To Grunge up chippies is not a perfect art, completely the opposite!
                  I just keep adding paint or sprays till I get the look I want, I really do not think about it.... but I did for this tutorial & it almost sent me over the edge! I never know what I will need until I am doing it.... not good for writing and taking shots for a step by step I can tell you....... see I am getting too wordy again! So here is what I came up with:

                  The supplies!
                  Base coat the chippies with white acrylic paint using a paint dabber (as before, I like the texture it creates).
                  Having a white base means that the
                  colour you add next will be more
                  vivid if you want a
                  muted tone skip this step!

                  I then dabbed some grey paint over the top in random spots. Use a heat gun to dry.

                  Then spray lightly with mists till you like the effect!


                  Spray the chippes as a group
                  so you get the random look
                  (and you don't waste product!)
                  Add a little more paint for a faded look.

                  Define the edges with a stamp pad to make them "pop" on the page.

                  In this step use a light touch remember less is more!
                  A final touch is to use a background stamp and Stazon ink randomly stamped on the chippies as they lay. Then a rough outline with a fineliner!


                  All done ready to attach to a page!!!!


                  So that is all from me "Phew" I hear you say, maybe I should have just stuck with the one technique but hey I was on a roll!!! Just a little over excited, sorry! 

                  To thank you for visiting my happy place and for putting up with my ramblings, I have decided to add some candy here. So to be in the running for a little something all you have to do is add a comment below (to say you were here) and maybe become a Follower (if you are not already).
                  Once again thanks for joining us on our little Hop, off you go and
                  ENJOY!!!!

                  You are now headed to the gorgeous Bella where I am sure you will find something pretty to feast your eyes on.
                  If you get lost here is the full List:

                  Be sure to head back to the Scrap FX Blog at the end to be in the running for this major prize full of Scrap FX goodness!!!!